
Hosting a Next JS application as static HTML
New Task – Next Challenge
We had to host a blog. A site to hold blog, about, careers and much more. Preferably a static site. In fact JAM stack was the actual mission to achieve hosting of blog in a CDN. One step at a time, we started looking for various JAM stack themes. We found some relevant themes but with a variety of frameworks used together. I felt overwhelmed to work with new skillset all together. I did try to clone some of the applications, and added necessary dependencies. Could not run them on dev. I gave up. Yes, I couldn’t put more time on it.
Few weeks later, while I was in my sprint work, out of nowhere I was asked to checkout an open source named Design-Details by Brian Lovin. Extremely lovely site with all there podcasts linked. What was I waiting for, I immediately cloned it. The application is running on nextJs. Now what? I installed the dependencies to initially run it in dev. It was a grand success. The application runs very much fine at port 3000. Now I had to bang my head around nextJs in order to export a production build and deploy the same.
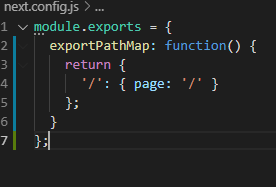
What next? It is all NEXT I had to deal with. Next is server side scripting language which uses react js for its front. Made me happy to know, it is easy to edit. When I opened the code to checkout the same, I found them all .ts files. Amazing. Anyhow, even before I had to make changes to the code, I went through the docs of next.org/docs. All I had to do is edit next.config.js to add / page i.e, index.html page under module.exports.
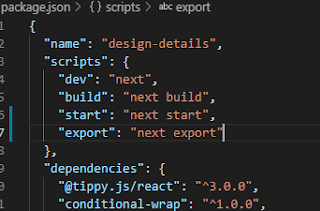
And then add additional script for “export” in package.json.
Now, simply run the following scripts
npm run build
npm run export
This will create a folder called “out” inside our project. That’s a fully functional static web app. We can now deploy it any static site hosting service and it will work fine.
Before we do that, it is always recommended to check the same in localhost. To achieve that, install “serve” as npm I -g serve. And then move to out directory. And use the commend as follows:
Serve -p 8080(any port as you wish)
Thumbs Up!!
One last thing was left. I got a design for blogs page in the same project. I created a json object for posts and imported it to the posts page. That’s it. The blog is up and running now.