
Reverse geocoding using MapboxAPI in React Application
There are many examples out there for various ways of using mapbox in web applications. Starting from styling the map, to locate user, to popup at pinned locations, and so on. One thing, which was badly required in my project, has limited resource. Reverse geocoding, is only found in documentation of official mapbox API. As I mentioned earlier, I work for a react project. I got to forward and reverse geocoding using mapbox API.
Without any delay, let us begun coding. As this post has to focus on geocoding, I will brief the initial setup for including mapbox in the application and adding marker part.
1. Install mapbox-gl using npm.
2. Import ReactMapGL , {Marker} from mapbox-gl
3. Before proceeding, register in mapbox site to get a unique access token for your project.
4. Create a component map.js
5. Declare a const for access token, so that we can reuse it.
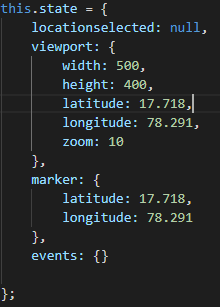
6. Also initialize state with, viewport, marker and events.
My state looks something like this:
Now, lets define some functions for drag events.
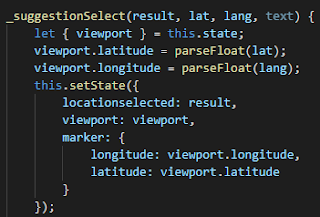
A function to update viewport, which can be used with ReactMapGL.
I have used lodash function to handle event on ReactMapGL, to achieve interactivity of the map. With this, we can move, zoom, etc with the map.
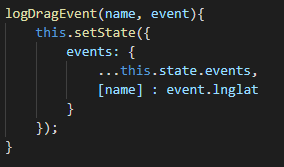
1. A function to log events. Because every time you drag the pin, its start point and end point change.
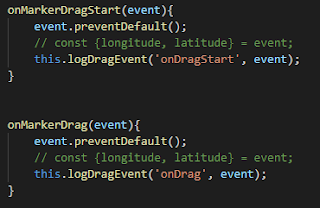
2. Now Drag functions. OnMarkerDrag, OnMarkerDragStart, OnMarkerDragEnd to be triggered when OnDrag, OnDragStart, OnDragEnd events occur respectively.
3. Every function should call logDragEvent() function.
Something like this:
It is important to keep a track of events to obtain the latest position of the pin.
4. OnMarkerDragEnd () should additionally update state.marker
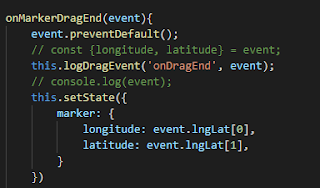
Drag Event object holds – lngLat[], distance, timestamp, pointer[] for handling mulptiple pointer is available, and many more key:value pairs. So, for now you have an interactive map along with draggable marker pin. We can also implement autocomplete concept or use custom search box above the map, to take user input. But our focus today is to use geocoding API to achieve forward and reverse geocode the map.
As there are no direct examples out there, let us use Mapbox Geocoding feature, referring the documentation.
Firstly, include the following in index.html
<script src='https://api.mapbox.com/mapbox-gl-js/plugins/mapbox-gl-geocoder/v4.4.1/mapbox-gl-geocoder.min.js'></script>
<link rel='stylesheet' href='https://api.mapbox.com/mapbox-gl-js/plugins/mapbox-gl-geocoder/v4.4.1/mapbox-gl-geocoder.css' type='text/css' />
1. We got to make some get calls to mapbox api to retrieve data, using forward and reverse geocoding.
2. Mapbox API provides an END POINT – mapbox.places which can be used for both forward and reverse geocoding.
3. When we pass text to this end point, it returns coordinates and places matching that text.
4. GET: url/mapbox.places/{text}.json/access-token
5. So, the coordinates returned can be used to pass to the marker to set the pin location
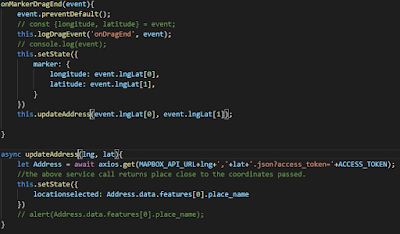
1. The above mechanism is called Forward geocoding
2. Coming to reverse geocoding, we can pass the coordinates to the end point as follows:
3. GET: url/mapbox.places/{lng,lat}/access-token
4. It returns the place at that coordinates.
This end point we are using does not allow us to store the places permanently. To do so, the API provides another end point called mapbox.places.permanent which is available for enterprise users only.
You could find the complete source code in MapBoxAPI-Geocoding branch of the project I have on github. This branch also shows the place as a popup for every pin movement.
NOTE: Do not forget to bind your functions in constructor.
Please drop your questions as comments for this post.
Thank you.